selenium自动化测试
一.自动化选型
| 不同点 |
selenium类(RF、Katalon、Macaca等) |
UFT(QTP) |
JS类库(Phantomjs、CasperJS、Puppeteer) |
| 是否开源 |
是 |
否 |
是 |
| 支持平台 |
Linux、Windows、Mac |
Windows |
Linux、Windows、Mac |
| 支持语言 |
Python、Perl、PHP、C#等 |
VB |
JS |
| 支持浏览器 |
ie、chrome、firefox、opera、safari |
chrome、firefox、IE |
PhantomJS、casperjS不支持、puppeteer:chrome |
| 支持录制 |
支持 |
支持 |
不支持 |
二.selenium环境搭建(以python示例)
-
python环境搭建
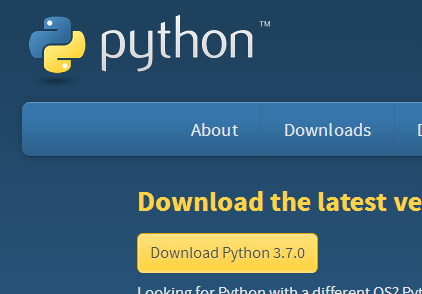
下载python
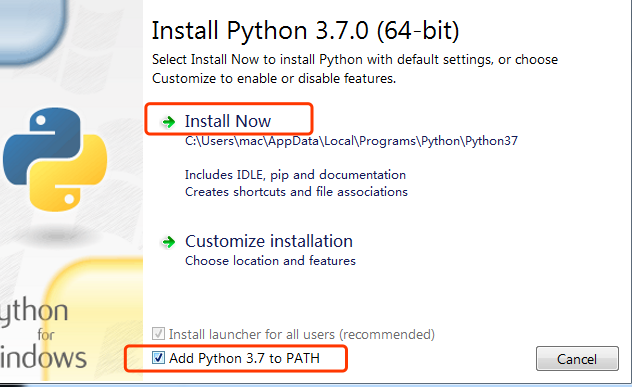
安装
验证
C:\Users\mac>python
Python 3.7.0 (v3.7.0:1bf9cc5093, Jun 27 2018, 04:59:51) [MSC v.1914 64 bit (AMD
4)] on win32
Type "help", "copyright", "credits" or "license" for more information.
>>>
- 安装selenium
pip install selenium
- 验证是否安装成功:
pip show selenium
能够看到selenium的详细信息则安装成功
Name: selenium
Version: 3.13.0
Summary: Python bindings for Selenium
Home-page: https://github.com/SeleniumHQ/selenium/
Author: UNKNOWN
Author-email: UNKNOWN
License: Apache 2.0
Location: /usr/local/lib/python2.7/site-packages
Requires:
Required-by:
- 安装浏览器。。。
- 下载浏览器驱动(以chrome为例)
进入淘宝npm镜像网站,进入对应浏览器驱动页面
http://npm.taobao.org/
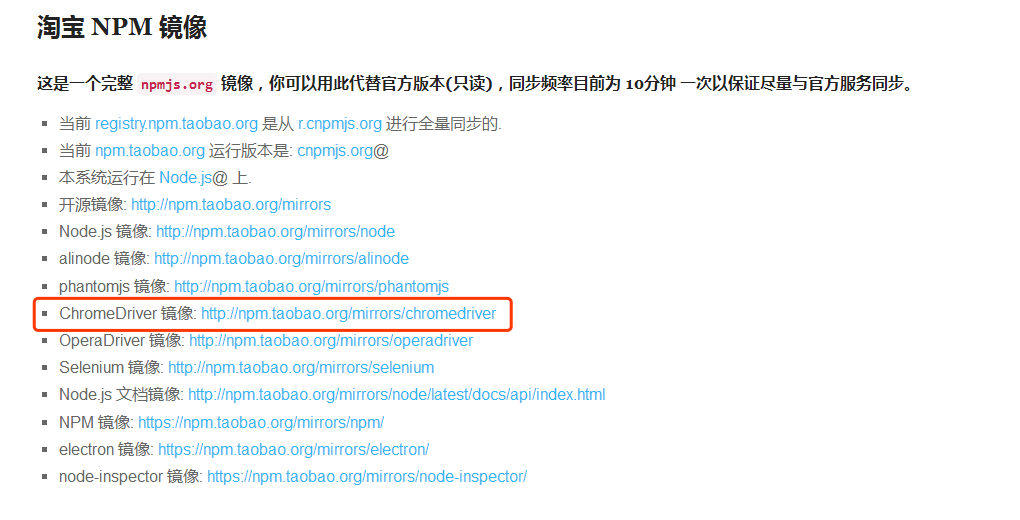
下载对应浏览器版本的驱动
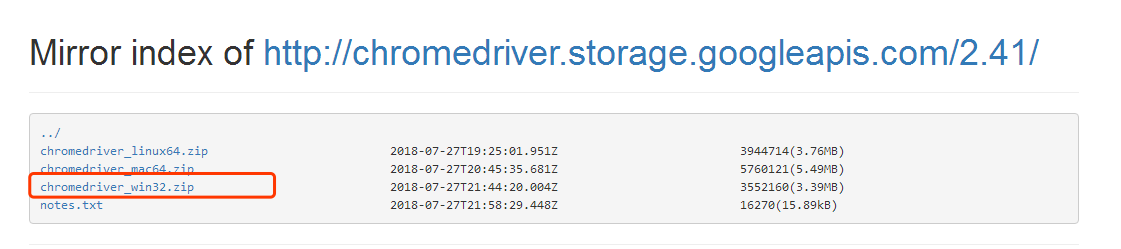
解压后放到环境变量位置即可
注意:
1.浏览器版本必须要和驱动版本对应,否则会出现调用不起来浏览器或者无法打开网页的问题
2.在firefox48版本以前firefox是不需要浏览器驱动的,但是在firefox48以后需要下载对应版本的geckodriver驱动
- 验证浏览器与驱动是否匹配
from selenium import webdriver
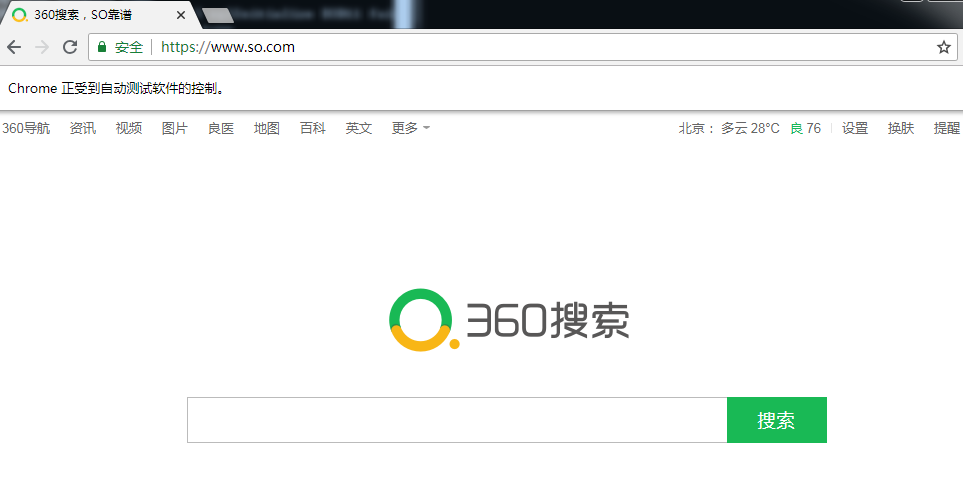
driver=webdriver.Chrome()
driver.get("http://www.so.com")
成功打开浏览器,并且打开指定网站,通常版本匹配就没问题了
三.录制回放–基于katalon recorder
优点:快速、简单
缺点:难维护
应用场景:适用于只需要完成当前任务,任务完成后不再需要使用了,使用次数较少的场景
目前selenium的录制工具有两种:
1.官方selenium ide
2.katalon recorder
推荐使用katalon recorder ,是katalon studio的子项目,具有比selenium ide更全面的功能
-
下载安装
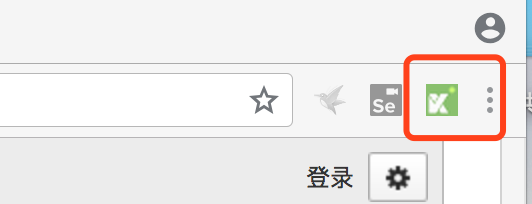
进入chrome应用商店,搜索katalon recorder,进行安装即可
https://chrome.google.com/webstore/category/extensions?hl=zh-CN
安装成功后,右上角会有对应图标
-
页面主要功能介绍:

录制实例:
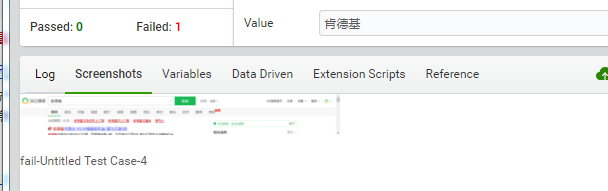
测试步骤:
打开www.so.com
输入框输入:肯德基
点击搜索按钮
录制过程:
1>点击Record
2>浏览器输入www.so.com
3>点击输入框
4>输入肯德基
5>点击搜索
6>点击stop
-
添加断言

查看失败截图
回放
play:回放当前指定的case
play suite:回放当前case所在测试套件
play all:回放所有case
数据驱动
生成脚本

四.selenium基础api
- 浏览器操作
#导入selenium
from selenium import webdriver
#创建chrome驱动实例,打开浏览器
driver=webdriver.Chrome()
#浏览器最大化
driver.maximize_window()
#浏览器最小化
driver.minimize_window()
#获取浏览器当前窗口大小
size=driver.get_window_size()
#设置浏览器窗口大小
driver.set_window_size(400,400)
#打开指定网页
driver.get("http://www.so.com")
#获取当前页面的链接地址
url=driver.current_url
driver.get("http://baike.so.com")
#后退
driver.back()
#前进
driver.forward()
#浏览器退出
driver.close()
driver.quit()
#截图
driver.get_screenshot_as_png()
driver.get_screenshot_as_base64()
driver.get_screenshot_as_file("filename")
driver.save_screenshot("filename")
#切换到当前被操作元素
ele=driver.switch_to.active_element
#切换alert、confirm、prompt框
alert = driver.switch_to.alert
#切换到默认页面
driver.switch_to.default_content()
#切换iframe
driver.switch_to.frame('frame_name')
driver.switch_to.frame(1)
driver.switch_to.frame(driver.find_elements_by_tag_name("iframe")[0])
driver.switch_to.parent_frame()
#获取浏览器所有句柄
handles=driver.window_handles
#获取当前句柄
current_handle=driver.current_window_handle
driver.switch_to.window()
#执行js脚本
driver.execute_script('script')
- 元素定位
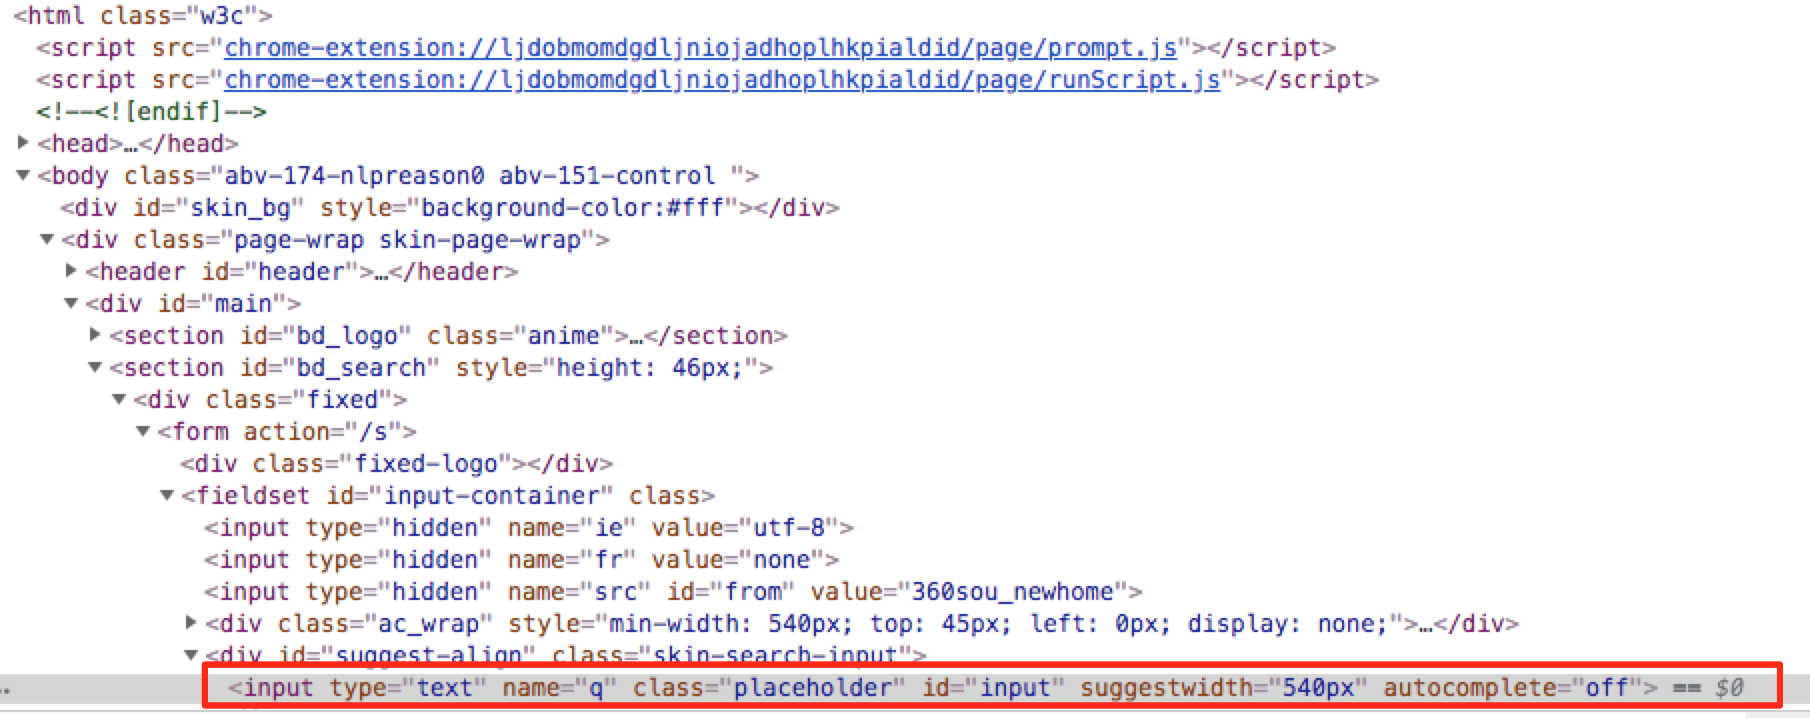
<input type="text" name="q" class="placeholder" id="input" suggestwidth="540px" autocomplete="off">
driver.find_element_by_id("input")
driver.find_element_by_name("q")
driver.find_element_by_class_name("placeholder")
driver.find_element_by_tag_name("input")
#通过link_text定位
<a href="http://www.so.com/link?m=aet4cncwddniEaPk6dHXguMLtzsuEZCshH9NOP1B83PNdna1JVlAE2E5xzKeyB2GUQSR9o8wo4KTK5n7ApE28%2FQ%3D%3D" data-url="http://ly.so.com/?src=tab_web" data-s="http://ly.so.com/s?q=%q%&src=tab_web" data-linkid="liangyi">良医</a>
driver.find_element_by_link_text("良医")
driver.find_element_by_partial_link_text("医")
以上定位方式都是通过元素的特定属性来定位的,如果一个元素它既没有id、name、class属性也不是超链接,这么办呢?或者说它的属性很多重复的。还有时候标签确实有id这个属性,但是id又是以一定规则自动生成的,这个时候就可以用xpath和css定位来解决。
- css定位
具有很强的灵活性,同时使用也是相对复杂
常见符号:
#表示 id选择器
.表示 class选择器
>表示子元素,层级
一个空格也表示子元素,但是是所有的后代子元素
#<input type="text" name="q" class="placeholder" id="input" suggestwidth="540px" autocomplete="off">
#通过标签定位
driver.find_element_by_css_selector("input")
#通过id定位
driver.find_element_by_css_selector("#input")
#通过class定位
driver.find_element_by_css_selector(".placeholder")
#通过属性定位
driver.find_element_by_css_selector('[name="q"]')
#以上都是单一形式的定位,上面的所有形式都可以进行组合定位
driver.find_element_by_css_selector("input#input")
driver.find_element_by_css_selector("#input[name='q']")
- xpath定位与常用函数
XPath即为XML路径语言,它是一种用来确定XML文档中某部分位置的语言。通俗一点讲就是通过元素的路径来查找到这个元素
#xpath定位
#通过绝对路径定位
#1.从html页面的该元素的最顶层元素写起
#2.以"/"分割每一层标签
#下标从1开始
#不归属该元素的同级元素标签不要写
#优点定位准确,但是一旦页面有更改,则需要重新定位
driver.find_element_by_xpath("html/body/div[2]/div/section[2]/div/form/fieldset/div[2]/input")
#通过相对路径
#1.以双"//"开头
#2.只要能定位到目标元素的唯一路径即可,不需要再向上查找
#3.路径越短越好,避免因为写的过长,导致频繁更改定位方式
driver.find_element_by_xpath("//fieldset/div[2]/input")
driver.find_element_by_xpath("//form/fieldset/div[2]/input")
#通过标签定位:上面写的都是通过标签来进行的定位
#通过属性定位(id,name,value,class等)
#1.使用中括号将属性名与属性值放在一起
#2.属性名前面加上@符号表示
driver.find_element_by_xpath("//input[@name='q']")
#通过索引定位
通常上面的方式基本上就可以定位到元素,但是对于一些动态生成的元素,路径重复性很高的元素,为了避免写太长的路径,有时候需要一些逻辑运算与xpath的函数来完成
#xpath中的逻辑运算(与或非)
driver.find_element_by_xpath("//input[@name='q' and @ id='input']")
#包含 contains函数
driver.find_element_by_xpath("//input[contains(@id,'input')]")
#元素文本信息text函数
driver.find_element_by_xpath("//*[contains(text(),'医')]")
#starts-with函数
driver.find_element_by_xpath("//input[starts-with(@id,'inpu')]")
#ends-with函数
driver.find_element_by_xpath("//input[ends-with(@id,'nput')]")
- 元素操作
#清除文本框内容
input_element.clear()
#点击操作
input_element.click()
#对文本框输入
input_element.send_keys()
#提交表单
input_element.submit()
#获取元素指定属性的值
input_element.get_attribute("name")
input_element.get_property("name")
#获取元素的大小
ele_size=input_element.size
#获取该元素的子元素
input_element.find_element()
#判断元素是否显示
input_element.is_displayed()
#判断元素是否可以使用
input_element.is_enabled()
#判断元素是否是选中状态
input_element.is_selected()
#查看元素的标签名
input_tag=input_element.tag_name
- js常用脚本
#页面滑动
js1="window.scrollTo(1000,1000)"
js11='window.scrollTo(0,0)'
js12='window,scrollTo(0,document.body.scrollHeight)'
driver.execute_script("arguments[0].scrollIntoView();", input_element)
#设置元素属性:例如修改时间控件,设置页面元素是否可见等,可以省去很多selenium的步骤
js2='document.getElementById("XXX").setAttribute("placeholder","thisismyplaceholder")'
#删除元素属性
js3='document.getElementById("XXX").removeAttribute("placeholder")'
#元素操作操作:click,focus,blur等
js4='document.getElementById("xxx").click()'
#元素定位  注意:这里需要有return
js5='return document.getElementById("xxx")'
- 鼠标事件
click(on_element=None) ——单击鼠标左键
click_and_hold(on_element=None) ——点击鼠标左键,不松开
context_click(on_element=None) ——点击鼠标右键
double_click(on_element=None) ——双击鼠标左键
drag_and_drop(source, target) ——拖拽到某个元素然后松开
drag_and_drop_by_offset(source, xoffset, yoffset) ——拖拽到某个坐标然后松开
key_down(value, element=None) ——按下某个键盘上的键
key_up(value, element=None) ——松开某个键
move_by_offset(xoffset, yoffset) ——鼠标从当前位置移动到某个坐标
move_to_element(to_element) ——鼠标移动到某个元素
move_to_element_with_offset(to_element, xoffset, yoffset) ——移动到距某个元素(左上角坐标)多少距离的位置
perform() ——执行链中的所有动作
release(on_element=None) ——在某个元素位置松开鼠标左键
send_keys(*keys_to_send) ——发送某个键到当前焦点的元素
send_keys_to_element(element, *keys_to_send) ——发送某个键到指定元素
#导入鼠标事件

from selenium.webdriver.common.action_chains import ActionChains
#双击
ActionChains(driver).double_click('target_element').perform()
#右击
ActionChains(driver).context_click("target_element").perform()
#拖动
ActionChains(driver).drag_and_drop("start_element","end_element").perform()
#鼠标移动到指定元素
ActionChains(driver).move_to_element("target_element").perform()
- 对话框处理(以alert为例,confirm,prompt方法一样)
#弹出一个alert
driver.execute_script("alert('helloworld')")
#切换到alert
my_alert=driver.switch_to.alert
#获取alert信息
alert_info=my_alert.text
#点击确定
my_alert.accept()
#点击X
my_alert.dismiss()
五.测试用例设计
用例1:打开浏览器,打开指定页面,查找元素,元素操作,断言,关闭浏览器
用例2:打开浏览器,打开指定页面,查找元素,元素操作,断言,关闭浏览器
目的:
1.尽可能少的打开浏览器
2.每个case互不影响
3.减少重复性代码
4.捕获异常try…except…else….finaly
5.保留现场
6.用例需要有说明
分析:
- 使用unittest管理与运行测试用例
- 测试夹具的使用
- 统一管理开启和关闭浏览器
import unittest
from selenium import webdriver
class TestCase(unittest.TestCase):
    @classmethod
    def setUpClass(cls):
        cls.driver=webdriver.Chrome()
    @classmethod
    def tearDownClass(cls):
        cls.driver.close()
    def setUp(self):
        self.driver.get("http://www.so.com")
    def tearDown(self):
        pass
    def test_case01(self):
        input_element=self.driver.find_element_by_id("input")
        input_element.send_keys("肯德基")
        search_botton=self.driver.find_element_by_id("search-button")
        search_botton.click()
        self.assertIn("肯德基" ,self.driver.title)
    def test_case02(self):
        input_element = self.driver.find_element_by_id("input")
        input_element.send_keys("麦当劳")
        search_botton = self.driver.find_element_by_id("search-button")
        search_botton.click()
        self.assertIn("麦当劳", self.driver.title)
if __name__ == '__main__':
    unittest.main()
六.selenium grid
例1:测试需要运行ie8,9,10,11四个浏览器
例2:测试需要验证同一个功能在同一个浏览器,但是在不同硬件配置上的执行情况
问题:
1.一台计算机没办法同时安装4个ie,需要运行其他安装不同版本的机器
2.需要运行远程机器上的浏览器
3.不同机器上的运行情况需要上报给主机
selenium grid完美的解决了这些问题
- 什么是selenium grid:宿主机能够运行控制远程机器运行自动化,同时自动收集运行情况的一个服务
- selenium grid使用场景
- selenium grid实例(需要java环境)
第一步:启动一个主节点(运行在宿主机)
#运行selenium服务 指定角色为hub ,端口号为4444
java -jar selenium-server-standalone-3.14.0.jar -role hub -port 4444
日志信息也说明了,客户端需要能够连接的机器名,子节点需要注册到宿主节点
21:53:53.220 INFO [GridLauncherV3.launch] - Selenium build info: version: '3.14.
0', revision: 'aacccce0'
21:53:53.220 INFO [GridLauncherV3$2.launch] - Launching Selenium Grid hub on por
t 4444
2018-09-02 21:53:53.594:INFO::main: Logging initialized @757ms to org.seleniumhq
.jetty9.util.log.StdErrLog
21:53:53.842 INFO [Hub.start] - Selenium Grid hub is up and running
21:53:53.842 INFO [Hub.start] - Nodes should register to http://10.211.55.4:4444
/grid/register/
21:53:53.842 INFO [Hub.start] - Clients should connect to http://10.211.55.4:444
4/wd/hub
第二步:启动子节点并且注册到宿主节点
java -jar selenium-server-standalone-3.14.0.jar -role node -port 5555 -hub http://10.211.55.4:4444/grid/register
日志
22:00:47.753 INFO [GridLauncherV3.launch] - Selenium build info: version: '3.14.
0', revision: 'aacccce0'
22:00:47.753 INFO [GridLauncherV3$3.launch] - Launching a Selenium Grid node on
port 5555
2018-09-02 22:00:47.945:INFO::main: Logging initialized @566ms to org.seleniumhq
.jetty9.util.log.StdErrLog
22:00:48.116 INFO [SeleniumServer.boot] - Selenium Server is up and running on p
ort 5555
22:00:48.116 INFO [GridLauncherV3$3.launch] - Selenium Grid node is up and ready
 to register to the hub
22:00:48.179 INFO [SelfRegisteringRemote$1.run] - Starting auto registration thr
ead. Will try to register every 5000 ms.
22:00:48.179 INFO [SelfRegisteringRemote.registerToHub] - Registering the node t
o the hub: http://10.211.55.4:4444/grid/register
22:00:48.537 INFO [SelfRegisteringRemote.registerToHub] - The node is registered
 to the hub and ready to use
第三步:代码改造
from selenium import webdriver
driver = webdriver.Remote(
        command_executor="http://127.0.0.1:5555/wd/hub",#指定远程需要运行的节点
         desired_capabilities={'browserName':"chrome"}#指定需要运行的浏览器
     )
driver.get("http://www.so.com")
driver.close()
七.PageObject模式
- 在写自动化过程中遇到的问题
1.页面频繁变动,导致自动化运行失败,需要修改元素定位
2.一个元素在很多个case中使用,每次更改case需要把所有用到的地方都改一遍
3.case多了维护困难,根本不知道这个元素是哪个地方的
- 什么是PO模式
1.页面对象模型 (POM)是一种设计模式,用来管理维护一组元组集的对象库
2.在 PO模式下,应用程序的 每一个页面都有对page class
3.每一个 page class维护着该 web页的元素集和操作这些方法
- po模式的优点:
1.定位与测试用例分离,便于维护
2.用例更清晰,更易于阅读
- PO模式实例
1.封装driver
2.封装base driver
3.封装页面
4.封装页面元素定位信息
5.编写case
from selenium import webdriver
from selenium.webdriver.common.by import By
class GetDriver():
    '''获取浏览器驱动'''
    def __init__(self,browser_name):
        self.driver=self.__get_driver(browser_name)
    def __get_driver(self,browser_name):
        __browser_name=browser_name.lower()
        try:
            if __browser_name.lower()=="chrome":
                __driver=webdriver.Chrome()
            elif __browser_name.lower()=="firefox":
                __driver=webdriver.Firefox()
            else:
                raise Exception("没有浏览器")
        except Exception as e:
            raise Exception("无法驱动浏览器")
        else:
            return __driver
class BasePage():
    '''页面基类'''
    def __init__(self,driver):

        self.driver=driver

    def get(self,url):
        try:
            self.driver.get(url)
        except:
            raise Exception("打开%s 页面识别"%url)

    def find_element(self,page_name,type,location):
        try:
            element=self.driver.find_element(type,location)
        except:
            raise Exception("没找到%s type=%s location=%s 这个元素"%(page_name,type,location))
        else:return element

class HomePageResource():
    '''首页页面资源信息'''
    input={"page_name":"首页","type":By.ID,"location":"input"}


class HomePage(BasePage):
    '''首页元素与操作'''
    def input(self):
        input_element=self.find_element(**HomePageResource().input)
        return input_element
import unittest
class TestCase(unittest.TestCase):
    @classmethod
    def setUpClass(cls):
        cls.driver=GetDriver("chrome").driver
        cls.home_page=HomePage(cls.driver)
    @classmethod
    def tearDownClass(cls):
        cls.driver.close()
    def setUp(self):
        self.home_page.get("http://www.so.com")
    def tearDown(self):
        pass
    def testcase01(self):
        self.home_page.input().send_keys("abc")
if __name__ == '__main__':
    unittest.main()
八.selenium使用中的坑
- handle与iframe切换
- 驱动360浏览器
- 驱动ie11浏览器
- jenkins调用远程windows的firefox、chrome
- phantomjs问题
